
the raindance guide to converting a lawn to a garden
In 2015 this backyard was just grass
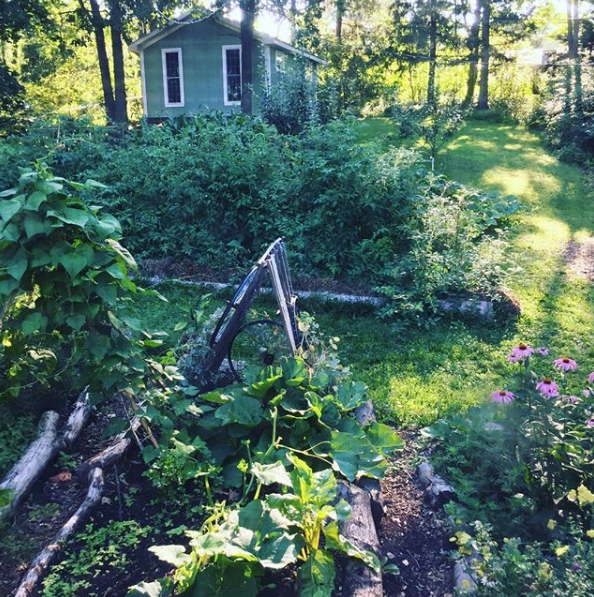
But this image was the summer view out our bedroom window in 2017
General Tips:
Fall is an excellent time to build and prepare raised beds for the following year. Spring works too! Anytime is a great time to help bees, grow your own organic food, and reduce the time you spend mowing the lawn!
It is possible to build lovely, useful raised beds for nearly free using Craigslist, the City’s free compost, and found natural materials. Your time is the real expense, but there is much joy in the doing!
The City of Ann Arbor offers free compost to residents on Saturday morning from 9am-noon. You can take one yard each Saturday (the employee at the weighing station verified this for me recently). Wear boots, bring a shovel, and cover your car or truck with a tarp to contain the spills. Folks take home compost in buckets, bags, boxes, etc.
If you build a bed in your front yard, you may find yourself in conversation with many neighbors, students, passerbys as you build, fill, plant, and harvest. This was an unexpected huge benefit!
Step 1- Choose your site thoughtfully.
Think about sunlight. Most garden guides advice 8+ of sunlight to grow vegetables, but we’ve found that we can grow all of the sun-loving crops (tomatoes, peppers, eggplant) very successfully in our shaded backyard. The frequent watering, excellent soil, and more vigilant weeding make for better plants grown our our back door than in our community garden plot.
Water access. Ann Arbor is blessed with a monthly average of 3.5 inches of rain during our best growing season (May- September), but garden vegetables and cutting flowers thrive with regular watering. Too many plants died in our community garden plot for lack of regular watering. Our backyard garden is much greener!
Soil. We didn’t worry much about the quality of our native soil (heavy clay) because we planned to build raised beds on top of our lawn.
Step 2- Lay down cardboard.
You can find free cardboard in dumpsters behind many retail stores around town, but we’ll let you in our cardboard secret. Shhh! The fabulous folks at our local bike shops have kindly let us pull huge bike boxes out of their dumpsters absolutely free.
We slightly overlap the cardboard pieces so that weeds do not grow through. We used a double layer (the boxes had two layers), and that seems to be fantastic for smothering weeds.
Step 3- Build garden borders for your raised bed.
Many choices of recycled, reused, or found materials:
Straw bales
Benefits: adds organic matter to soil, inexpensive, makes tall (18 inch) raised beds which is great for vegetable roots, fairly easy for one person to move around with a wheelbarrow, sustainable
Detractors: straw bales can contain weed seeds that may sprout in the bale, some people report vole trouble when using lots of straw
My decision: We purchased about 50 bales of straw for $2.50/bale on craigslist and had it delivered by the farmer for a small fee (we split the fee with a neighbor who wanted straw too!) The farmer even helped me carry the bales up the hill to our backyard. It was quick and easy to line up the bales end-to-end in a line to create the walking paths of my new garden bed. Then all I had to do was fill in the beds with soil.
Cedar planks
Benefits: crisp edges, great look, not treated with chemicals but naturally durable
Detractors: takes time and a power drill to build beds, cedar is expensive, need to replace cedar in 5+ years due to wood rotting
My decision: We built cedar beds in our front yard, where we were more concerned about curb appeal and aesthetics. We didn’t want our beds spilling over onto the sidewalk. We purchased cedar from Fingerle Lumber. After cutting the boards to length, it took Kristen several hours to secure each bed together with screws.
Logs
Benefits: free or inexpensive, very natural look, sustainable
Detractors: takes some time to find free logs on craigslist, may need a pickup truck and a strong friend to haul logs to your home, moving large logs around is difficult and could cause injury
My decision: We used logs as a border for our garden. We found free black locust logs and spent an afternoon cutting the logs to size and hauling them home. It was very difficult to get them up the hill. Adam bent our wheelbarrow in half doing it. However, since then we’ve used some smaller-diameter logs and found them much easier to work with.
Step 4- Create soil.
We used a mixed method of creating soil and it seems to have created some very sturdy, healthy vegetable plants. We’ve had very few weeds this first year as compost, our primary ingredient, has been heated to such a high temperature that weed seeds have died.
Here’s a list of the different organic materials we’ve thrown in our raised beds:
Compost, free from the City of Ann Arbor
Manure, free from a local horse farm (just google for riding stables and give them a call, and try to ask if they have aged manure (best!) or fresh manure (you’ll need to let this decompose before planting in it)
Grass clippings, free, raked from the park and our lawn
Leaves, free, collected from the curb around our neighborhood during leaf season (try not to use leaves from black walnut or black locust as these inhibit veggie plant growth)
Woodchips, free, delivered to our driveway by local tree trimming companies working in the neighborhood (just google for companies and call to ask if they’ll drop a load for you)
Step 5- Mulch!
Mulch is the secret to success for home gardeners. You can use straw, hay, woodchips, landscape fabric, or black plastic. We’ve used all of these at one point or another and each has its own benefits, but make sure you use something!
Mulch retains soil moisture and suppresses weeds. In our very first garden our weeds grew taller than our vegetables, but the next year we were prepare and used black plastic. We laid it down in the spring on our bare soil, staked it to the ground, and cut holes in it to plant our tomatoes, peppers, etc. We spent very little time weeding and we harvested a bumper crop that encouraged us to keep gardening.
We love to help people grow food!